Friday, December 24, 2010

How To Block a Website

There are many reason why you need to know how to block a website. Some of the most common reasons are you have been targeted by spammers who use adware and popups to attack your PC. Other reasons may be to prevent your children from having access to certain site content such as porn and gambling.

Depending on the level of security you wish, learning how to block a website may require a adjustments of your web browser, the use of internet filtering software or editing of your host file. At any rate you can try all methods to see which works best for you.

Block a Website using Internet Explorer:
Internet Explorer version 5 and later offer the ability for heighten security and privacy. You can block a site by following the directions below:
  • Load your Internet explorer
  • Click Tools
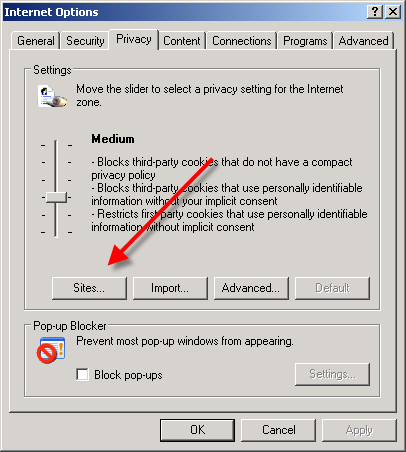
  • Click Internet Options
  • Click the Privacy tab
  • Under the Privacy window, Click Sites
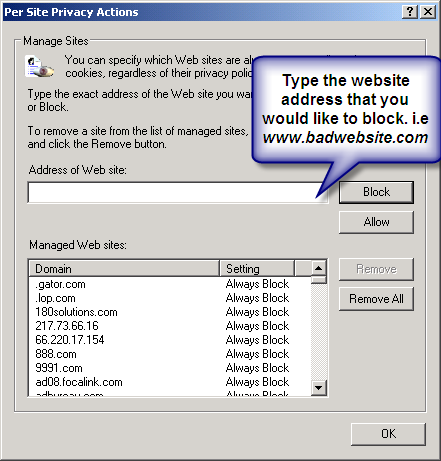
  • Type in the site address that you want to Block and Click OK.
Remember this technique only blocks on one site at a time. Parental control software will allow you to block multiple sites and categories.


Other way to block a website using Internet Explorer:
Click Tools ->Internet Options->Security->Restricted sites->Sites->Type in the site address and Click ADD then click OK.


Block A Website in All Web Browsers:
This action will require you to edit your Host file. Your host file is a computer file used to store information on where to find a node on a computer network.


Here are the steps in Windows XP:
  • Click Start->All Programs->Accessories->Command Prompt2.
  • Click Command Prompt This will open a DOS command window.
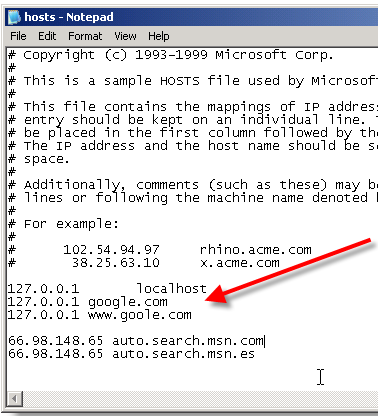
  • Type: notepad C:/Windows/System32/drivers/etc/hosts
  • Locate the line 127.0.0.1 localhost
  • To block the website google.com for example, just add this text under 127.0.0.1 localhost:
127.0.0.1 google.com
127.0.0.1 www.google.com
  • You can add as many sites any site, However you will need to prefix it with "127.0.0.1".
  • Save the file
Google will now be blocked in all web browser. This is an advanced but easy method on how to block a website.

Best and fast way to Lock your computer

Lock My PC™ is an easy in use, powerful and compact tool to lock your computer from unauthorized use. When you leave your computer unattended, the program disables the hot keys (including Ctrl+Alt+Del), mouse, locks CD/DVD ROM doors and displays a lock screen. Nobody can access your system without providing the correct unlock password.


Unlike another similar computer lock software that cannot lockCtrl+Alt+Del on a computer running Windows XP, our Lock My PC runs own keyboard driver to block such key combinations. Moreover, bulletproof startup lock guarantee that when your computer locaked at startup, this lock cannot be bypassed even in safe mode!

Why Lock My PC ?
You don't like snoopers. They are always prying into your e-mail messages, programs, data, files, etc. Lock My PC allows you to lock your computer with a password while you leave it unattended. You can lock your computer manually, with a menu or hotkey, or set up auto lock when your computer is idle.

Features and benefits:
  • Quick and safe computer lock by hot key, or mouse click
  • Autolock when computer is idle
  • Correct Ctrl+Alt+Del lock
  • Bulletproof startup lock (couldn't be bypassed in safe mode)
  • Different installation mode - setup for home or corporate use
  • CD/DVD-ROM doors lock
  • Multi-user support
  • Multimonitor support
  • Auto turnoff when computer is locked for a long time
  • Blind password option
  • Stealth mode
  • Windows XP x64 compatibility
  • Custom lock screens
  • Cycling lock screen images
  • Screen saving effects
  • Lock screen transparency - you can view movies under the locked screen
  • Password protected settings, quit and uninstall
  • Command line options
  • and many more ...

Difference from standard Windows XP computer lock feature
A lot of users believe that Lock My PC (as well as any other third party computer lock software) is useless because Windows XP has integrated computer lock feature. Well, indeed, you can simply press Win+L on Windows XP computer keyboard and your screen will be safely locked. What advantages Lock My PC has over Windows computer lock?

First of all, when your computer is locked by Windows Lock feature, anyone who has Windows Administrative privileges can unlock your computer. Such unlock will force to close your session (all unsaved changes will be lost). If Welcome screen option is enabled on your computer (the default settings for non-domain computer), Win+L doesn't lock the computer at all - it temporary switches the user off and displays the welcome screen - if you share your computer with others, they can logon with their usernames and use your computer. Moreover, if you share your account with other users (it's common for home PC), Windows XP lock feature is useless at all - your folks will unlock your computer without any problem.

Another benefits of Lock My PC in comare with Windows lock feature:
  • Custom lock screens and transparent lock screen options - your computer can be used as a presentation machine - the screen displays pictures or video, but nobody can touch your computer;
  • Secure Lock before Windows welcome/logon screen;
  • Displaying unsuccesfull unlock attempts - you will be notified if anyone tried to unlock your computer;
  • If Lock My PC is used in muilti-user mode, a supervisor can unlock the computer without closing user session;
  • You can lock CD/DVD ROM doors along with the desktop, keyboard and mouse - this can prevent CD media from being stolen while you are out;
  • Command line support allows you to use Lock My PC in Internet kiosks.

Safe and secure
Lock My PC provides reliable locking mechanism that impossible to bypass:
Keyboard driver installed with Lock My PC blocks different key combinations like Ctrl+Alt+Del, Alt+Tab, Ctrl+Esc and many others.
Booletproof startup lock ("Always lock at startup" option) displays password prompt box before Windows logon/welcome screen and (unlikle the most of desktop locking software) bannot be bypassed in Windows safe mode.

Easy to use
As soon as the installation completed, double click on the Lock My PC tray icon to lock the computer.
Right click on the tray icon to get access to the program settings. All settings are groupped by cathegoriies.

Autolock computer after certain time of inactivity
You can set up Lock My PC to lock your desktop automatically if the computer is idle during a certain period of time. Moreover you can set up Lock My PC to switch the computer off (Hibernate, Standby etc.) if your computer was locked during a certain period of time.

Stealth mode
Lock My PC can work in stealth mode. Stealth mode is a state when the program is running on your computer but does not show any sign of its presence in memory. To activate stealth mode, enable options "Do not show tray icon at startup" and "Hide Lock My PC from Task Manager".

Two installation modes
Lock My PC can be used both in single-user and multi-user environment. During the installation process, you will instruct Setup wehter to install Lock My PC in single-user mode or in multi-user mode.
In single-user mode, Setup will create Lock My PC shortcuts only for you. Locked computer can be unlocked only with your password. Some advanced options for corporate use will be blocked. This mode is ideal for home use.
In multi-user mode, Setup will create Lock My PC shortcuts for all user accounts. Each Lock My PC user will have their own password. The user who installed Lock My PC will be Lock My PC Administrator and his/her password - the administator's password. This mode is ideal for corporate use.

Custom Lock Screens
Lock My PC comes with a set of different lock screens. Lock screens are located in LockScreens subfolder of Lock My PC program folder.
You can create your own Lock Screen pictures and use them with Lock My PC. Your computer will look cool and unique when it is locked. You can use GIF, JPEG, BMP and animated GIF images as lock screens. Lock Screen transparency level option will allow you to vary the transparency from fully opaque to fully transparent. The latter allows you to lock keyboard and mouse only and may be helpful when you are watching videos or running presentations on your PC.

By the way, you can get this nice tool by downloading at Here.

How To Enable Task Manager

Some Malware and Trojan often disable access to Windows Task Manager. Fortunately, a few quick Registry edits are usually all that are needed to regain control.


Here's how to do it:
  • Click Start
  • Click Run
  • Type REGEDIT
  • Click OK and The Registry Editor will now open
  • Browse to the following key:HKEY_CURRENT_USER\Software\Microsoft\Windows\CurrentVersion\Policies\system
  • In the right pane, look for the value: DisableTaskMgr
  • Right click DisableTaskMgr and select Delete. (When prompted with "Are you sure you want to delete this value", select Yes.
  • Now browse to the following key:HKEY_LOCAL_MACHINE\SO

Tuesday, December 21, 2010

Make Internet Explorer 7 Faster

Internet Explorer has been in a features arms race with Firefox for a while. More and more people are switching to Firefox because of its speed and stability. A big reason people still use Internet Explorer is it is the first browser that a new user will see so they become familiar with it.. If Internet Explorer did not ship with Windows it would not have the amount of users it does.


If that new user wants to use Internet Explorer but wants to give their browsing a speed boost. Here are a few tips.

If you Don't Need a Proxy Don't Use One.
A proxy server is used if you have a slow connection. If you have a high speed connection you usually don't need it. Here is how you remove it. Go to tools and select Internet Options. In the Internet Options click on the Connections tab and press the LAN settings. Just remove all of the check marks, click on OK.

Get Rid of 3rd Party Toolbars
Some software companies have learned that there is money to be made by installing their software branded toolbar. The problem with these toolbars is when installed they take up bandwidth and computer resources while you browse the internet. To remove the toolbars you don't need, just identify the toolbar and remove it for add/remove programs. If it is not listed in add/remove programs it may be spyware. You will then need to scan your computer with your favorite spyware/malware software.

Increase the Amount of Connections Internet Explorer uses.
By default Internet Explorer only uses 10 simultaneous connections to download content from a webpage. Here is how you can increase the amount of connections. Open notepad and paste the code below in it.

Windows Registry Editor Version 5.00

[HKEY_CURRENT_USERSoftwareMicrosoftWindowsCurrentVersionInternet Settings]

"MaxConnectionsPerServer"=dword:00000020

"MaxConnectionsPer1_0Server"=dword:0000020

Save the file by clicking save as, change Save as type to All Files, name the fileIEfaster.reg.
Now, merge that registry setting to registry by double clicking fileIEfaster.reg and Click Yes on the dialog that appear. Restart your computer and done.

So there you have it. With these few changes you can really change the performance of Internet Explorer. If you want a completely better experience give Firefox a try. You won't be disappointed.

Copy or Move Files Faster with TeraCopy Pro 1.22

TeraCopy is a compact program designed to copy and move files at the maximum possible speed.


Features:
  • Copy files faster. TeraCopy uses dynamically adjusted buffers to reduce seek times. Asynchronous copy speeds up file transfer between two physical hard drives.
  • Pause and resume file transfers. Pause copy process at any time to free up system resources and continue with a single click.
  • Error recovery. In case of copy error, TeraCopy will try several times and in the worse case just skips the file, not terminating the entire transfer.
  • Interactive file list. TeraCopy shows failed file transfers and lets you fix the problem and recopy only problem files.
  • Shell integration. TeraCopy can completely replace Explorer copy and move functions, allowing you work with files as usual.
  • 64-bit OS support. Shell integration works in both 32-bit and 64-bit versions of XP

Download this tools at Here or Here.

How to avoid Windows XP Re-activation

The time may come that you'll need to reinstall your Windows XP. It could happen. Maybe you'll add a new motherboard or hard drive. Maybe you'll get constant errors and problems that just won't go away. Or perhaps you're a neat freak who wants to rid yourself of clutter and start fresh with a clean operating system. If you do reinstall Windows XP, then you'll need to re-activate it too; that is, unless you keep this tip handy.


See, the first time you activated XP it created a file called "wpa.dbl" that lives in the WINDOWS\system32 folder. By creating a backup of this file on disk, you can simply put it back into the folder after reinstalling XP and avoid the whole re-activation hassle. Here's how...
  • Go to My Computer then select your hard drive (usually drive C). Go to the WINDOWS\system32 folder and scroll way down until you find the wpa.dbl file.
  • Right-click and choose "Send To" then either floppy disk (make sure you have a disk in), flash disk or CD-R/RW.

Now, when you reinstall Windows XP you'll come to the activation screen, decline to activate and let the install finish.
Restart your computer in Safe Mode (keep hitting F8 at start-up then when the Advanced Boot Options menu appears arrow down to Safe Mode).

Find your way back to the WINDOWS\system32 folder. It's a good idea to rename the wpa.dbl file you're replacing just in case you run into problems, so call it something like "wpa.nothing".

Get the backup disk and copy the old wpa.dbl file back to theWINDOWS\system32 folder and reboot.

There you go, your XP is up and running again.

Note: Your wpa.dbl file might NOT WORK on another computer.

Sunday, December 19, 2010

Disabling Vista’s User Account Control (UAC)

User Account Control (UAC) is a feature in Windows Vista that can help prevent unauthorized changes to your computer. UAC does this by asking you for permission or an administrator* password before performing actions that could potentially affect your computer's operation or that change settings that affect other users.

UAC will alert you with one of the following messages:

Windows needs your permission to continue

A Windows function or program that can affect other users of this computer needs your permission to start. Make sure to ensure that it's a function or program you want to run.

A program needs your permission to continue

This will happen when a program that's not part of Windows needs your permission to start. It has a valid digital signature indicating its name and its publisher, which helps to ensure that the program is what it claims to be. Make sure that this is a program that you intended to run.

An unidentified program wants access to your computer

This is caused by a program that your administrator has specifically blocked from running on your computer is trying to run. To run this program, you must have an administrator unblock it.


The main reason to use UAC is to prevent malware and spyware from installing or making changes to your computer without your permission. This comes in handy when you have users who may go to inappropriate websites or download software from the Internet that may be of risk to their computer. If you trust your users or if its just you that will be using your computer and you are confident that you will not be installing anything you shouldn’t then you can turn this feature off.

Here is how you turn the User Account Control feature off:
  • Open User Accounts from Control Panel.
  • Click on turn User Account Control on or off.
  • Uncheck the box that says Use User Account Control (UAC) to help protect your computer.
  • Click Ok. You may have to enter administrator credentials depending on who you are logged in as.
  • Restart your computer for the changes to take effect.

System Recovery Options in Windows Vista

The System Recovery Options menu Windows Vista contains several tools that can help you recover Windows from a serious error. You can perform repairs to the files that Windows uses to start itself, perform a restore operation using System Restore, and restore your entire computer and system files using backups that you have made previously.


The Recovery Console in earlier versions of Windows has been removed in Vista and replaced by several tools located in the System Recovery Options menu. The System Recovery Options menu is on the Windows installation disc. The menu might also be installed on your hard disk if your computer has pre-installed recovery options.

Here are the tools you can use to recover your system:

Startup Repair
Fixes certain problems, such as missing or damaged system files that might prevent Windows from starting correctly. When you run Startup Repair, it scans your computer for the problem and then tries to fix it so your computer can start correctly.

System RestoreThis option helps you restore your computer's system files to an earlier point in time. It's a way to undo system changes to your computer without affecting your personal files, such as e-mail, documents, or photos. If you use System Restore when the computer is in safe mode, you cannot undo the restore operation. However, you can run System Restore again and choose a different restore point if one exists.

Windows Complete PC Restore
Restores the contents of your hard disk from a backup. Windows Complete PC Backup and Restore is not included with Windows Vista Starter, Windows Vista Home Basic, or Windows Vista Home Premium.

Windows Memory Diagnostic Tool
Scans your computer's memory for errors.

Command Prompt
Command Prompt replaces the Recovery Console from earlier versions of Windows. Advanced users can use Command Prompt to perform recovery-related operations and also run other command line tools for diagnosing and troubleshooting problems.

For more detailed information on how to use these tools type in the name of the tool in Windows help.

To access the System Recovery Options menu

  • If you have a Windows installation disc:
  • Insert the installation disc.
  • Restart your computer.
If prompted, press any key to start Windows from the installation disc. If your computer is not configured to start from a CD or DVD, check your BIOS settings.

  • Choose your language settings, and then click Next.
  • Click Repair your computer.
  • Select the operating system you want to repair, and then click Next.
  • On the System Recovery Options menu, click a tool to open it.

If your computer has preinstalled recovery options:

  • Remove all floppy disks from your computer, and then restart your computer.
  • Do one of the following:
  • If your computer has a single operating system installed, press and hold the F8 key as your computer restarts. You need to press F8 before the Windows logo appears. If the Windows logo appears, you will need to try again by waiting until the Windows logon prompt appears, and then shutting down and restarting your computer.
  • If your computer has more than one operating system, use the arrow keys to highlight the operating system you want to repair, and then press and hold F8.
  • On the Advanced Boot Options screen, use the arrow keys to highlight Repair your computer, and then press Enter.
  • Select a keyboard layout, and then click Next.
  • Select a user name and enter the password, and then click OK.
  • On the System Recovery Options menu, click a tool to open it.

Friday, December 17, 2010

How to Hack Into a Windows XP Computer Without Changing Password

There is a method to login to a password protected Windows even if you do not have the password is by making Windows accepting any passwords.


There is a far better way to get into Windows XP. It is easy and it does not reset the password. Hack into a computer running Windows XP without changing the password and find out all and any passwords on the machine (including admin accounts). You do not need access to any accounts to do this. Of course, do not do this on anyone elses computer without proper authorization.

Steps to Hack into a Windows XP Computer

1. Get physical access to the machine. Remember that it must have a CD or DVD drive.
2.Download this archive file (Size: 4.5 Mb).
3. Unzip the downloaded PCHaCKs-DreamPack.zipand you’ll get dpl.ISO.
4. Use any burning program that can burn ISO images like UltraISO, PowerISO or Nero.
5. After you have the disk, boot from the CD or DVD drive. You will see Windows 2000 Setup and it will load some files.
6. Press “R” to install DreamPackPL.
7. Press “C” to install DreamPackPL by using the recovery console.
8. Select the Windows installation that is currently on the computer (Normally is “1″ if you only have one Windows installed)
9. Backup your original sfcfiles.dll by typing:
ren C:\Windows\System32\sfcfiles.dll sfcfiles.lld” (without quotes)
10. Copy the hacked file from CD to system32 folder. Type:
copy D:\i386\pinball.ex_ C:\Windows\System32\sfcfiles.dll” (without quotes and assuming your CD drive is D:)
11. Type “exit”, take out disk and reboot.
12. In the password field, type “dreamon” (without quotes) andDreamPack menu will appear.
13. Click the top graphic on the DreamPack menu and you will get a menu popup.


14. Go to commands and enable the options and enable the god command.


15. Type “god” in the password field to get in Windows.

You can also go to Passwords and select “Logon with wrong password and hash”. This option allows you to login with ANY password.

Speed up your XP and Vista by hack its system registry

Do you know that your computer is like your car: it needs periodic maintenance to keep it running at optimum performance. Installing and un-installing programs, surfing the Internet, emailing, and other everyday activities create a sort of “sludge” that builds up in your computer over time, much like an automobile engine. After a while, it doesn't startup like when it was new, it stalls unexpectedly, and performance is sluggish on the (information) highway.


Of course, the fastest and easiest way to speed-up your computer is to allow a software program to do it for you! Although you will find that all of the adjustments in this book will speed up your system, the most effective and easiest way to give your computer blazing speed is to clean up your system’s Registry.

We strongly recommend running a free Registry scan to find out how many errors you computer is hiding from you. Your computer will likely have hundreds of Registry errors that are dramatically slowing down the potential speed and performance.

Or you can try the shareware of these registry cleaner programs, such as System Cleaner, Registry First Aid, RegSeeker or TuneUp Utilities 2009 for tune up your Windows XP and/or Vista.

Keep Protect Your FaceBook and Twitter Privacy

Surfing the web no longer a solo activity. Facebook, Twitter, and other social networks have quickly become an integral part of the online culture, and with them comes an array of serious threats to your privacy. In this article, I’ll identify some of the key dangers of social networking and offer a few easy steps that you can take to stay safe online. Social networking is built on the idea of sharing information openly and fostering a sense of community. Unfortunately, an online network of individuals who actively share their experiences and seek connections with other like-minded people can be easy prey for hackers engaged in social engineering and phishing attacks. It’s important to be aware of the threats and to use discretion in all of your online interactions.

Take Care Before You Share Online
For starters, even in an open community of sharing, you should observe commonsense boundaries. As President Obama warned students in his September address to schools, “be careful what you post on Facebook. Whatever you do, it will be pulled up again later somewhere in your life.” The core truth of that statement can be applied to any social networking site, and possibly to the Internet as a whole. As a general rule, refrain from posting things online that you will regret later. The odds are good that someone, someday, will stumble across it, and it may come back to haunt you— especially if you are planning to run for public office. If you think that abstaining from posting embarrassing or inflammatory comments online ruins the fun, you’re playing a dangerous game. Remember who your friends are, and know that a friend of a friend can be an enemy.

Don’t Lose Sight of Who Your Friends Are
When you write a Twitter tweet or post a Facebook status update, you have to keep your audience in mind. More and more these days, we hear stories about people who forgot that their boss was part of their network and then said things online that resulted in their being reprimanded or even fired. The adverse consequences of posting inappropriate on line comments have become so commonplace—at least anecdotally—that they have earned an entry in the Urban Dictionary: Facebook fired. Even announcing something as seemingly innocuous as “I’m bored” in a status up - date during work hours can have dire consequences if the wrong people see it. With services like Twitter, and with the recent changes to Facebook that permit any interested party to view and search your updates, you really have no way to hide.


Recognize the Visibility of Your Posts
You’ve thought it through, and you want to shout to the world how you feel about having to work overtime and during a weekend that you had earmarked for recreational activities. You have checked and double checked, and you’ve determined that your boss is not in your network, so you let loose on the keyboard and speak your mind. Unfortunately, you’re not home free (figuratively speaking) just yet. Being outside of your network, your boss can’t see your post directly, but if a Facebook friend who is connected with your boss comments on your status update—even just to say “I sympathize”— your boss may be able to click on the link through the friend and see your post. Go ahead, be social. Share your trials and tribulations with your growing network of adoring followers. But for your own safety, keep one essential rule in mind: Never post anything online that you wouldn’t be comfortable having everyone you know see—because eventually they probably will see it.


Define the Parameters of Your Privacy
Marrying privacy and social networking may seem terribly unintuitive. How can you be social and open, and yet protect your privacy? Well, just because you are choosing to share some information with a select group of people does not necessarily mean that you want to share everything with everyone, or that you are indifferent about whether the information you share is visible to all. Facebook, in particular, has drawn unwanted attention in connection with various privacy concerns. If you have used Facebook for a while, you may have noticed advertisements that incorporate your friends’ names or photos associated with them. Facebook does provide privacy controls for you to customize the types of information available to thirdparty applications. If you look at the Facebook Ads tab of the privacy controls, though, you’ll notice that it doesn’t give you any way to opt out of the internal Facebook Ads. Instead, it states (alarmingly) that “Facebook strives to create relevant and interesting advertisements to you and your friends.”

Approach Tattletale Quizzes With Caution
For many users, one of the primary attractions of Facebook is the virtually endless selection of games and quizzes. And part of their allure is their social aspect. In the advergames, you compete against your friends; through the quizzes, you learn more about them while being briefl y entertained. The ACLU exposed problems with how much information these quizzes and games share, however. Typically, when a Facebook user initiates a game or quiz, a notice pops up to declare that interacting with the application requires opening access to information; the notice also provides the user the opportunity to opt out and cancel, or to allow the access to continue. The permission page clearly informs the user up front that allowing “access will let [the application] pull your profile information, photos, your friends’ info, and other content that it requires to work.” Under the circumstances, you may wonder (as the ACLU has) why a game or quiz application would “require” access to your friends’ information in order to work.


Facebook Policy Concerns in Canada
Facebook’s privacy policies have run afoul of the Canadian government, too. Canada’s Privacy Commissioner has determined that those policies and practices violate Canadian privacy regulations, and has recommended various changes Facebook should make to comply with them. One of the commissioner’s biggest concerns involves the permanence of accounts and account data. Facebook offers users a way to disable or deactivate an account, but it doesn’t seem to provide a method for completely deleting an account. Photos and status updates might be available long after a user has shut down a Facebook profile. And like the ACLU, the Canadian government is unhappy about the amount of user information that Facebook shares with thirdparty application providers.

Exercise the Privacy Controls You Have
Although the concerns of the ACLU and the Canadian government run a little deeper, Facebook does offer privacy controls for restricting or denying access to information. Since Facebook is a social networking site designed for sharing information, many of the settings are open by default. It is up to you to access the Privacy Settings and configure the options as you see fit. For each available setting, you can choose to share information with Everyone, with My Networks and Friends, with Friends of Friends, or with Only Friends; if you prefer, you can customize the settings to finetune access further.


Beware of Hijacking and Phishing Scams
By its very nature, social networking is all about socializing, which means that users are more than usually disposed to let their guard down and share information. They come to the network to expand their professional connections, reestablish contact with old friends, and communicate in real time with pals and peers. And for predatory bad guys, launching social-engineering and phishing attacks in this convivial environment is like shooting fish in a barrel. Most people know not to respond to e-mail requests from exiled Nigerian royalty promising millions of dollars in return for help smuggling the money out of the country. (Anyone who doesn’t know better probably shouldn’t be on the Internet; such people are a danger to themselves and to others.) But what if a good friend from high school whom you haven’t seen in 18 years sends you a message on Facebook explaining how her wallet was stolen and her car broke down, and asks you to wire money to help her get home? You might be less suspicious than you should be. Attackers have figured out that family and friends are easy prey for sob stories of this type. Using other attacks or methods, they gain access to a Facebook account and hijack it. They change the password so that the legitimate owner can’t get back in, and then they proceed to reach out to the friends of the hijacked account and attempt to extort money such a Facebook message or e-mail plea, pick up the phone and call the person directly to confirm its legitimacy.

Don’t Let a Tiny URL Fool You
Another threat that has emerged recently as a result of social networking is the tiny-URL attack. Some URLs are very long and don’t work well in e-mail or in blog posts, creating a need for URLshortening services. In particular, Twitter, with its 140-character limit, has made the use of URL shortening services such as Bit.ly a virtual necessity. Unfortunately, attackers can exploit a shortened URL to lure users into accessing malicious Web sites. Since the shortened URL consists of a random collection of characters that are unrelated to the actual URL, users cannot easily determine whether it is legitimate or phony. TweetDeck, a very popular application for sending messages in Twitter, provides a ‘Show preview information for short URLs’ option, which offers some protection.
The preview window supplies details about the shortened URL, including the actual long URL that the link leads to. If you aren’t using TweetDeck for Twitter, or if you need to deal with shortened URLs on other sites and services, maintain a healthy dose of skepticism about what might lie behind the obfuscated address that a message points to.